Friday, November 11, 2011

Easy as 1, 2, 3

 I found this project idea on pinterest.  It's so easy.  Take some canvas and draw on it with glue making a thick line to create whatever design you want.


Let the glue dry.  When it's dried, paint over the canvas and glue, all in one color.  You're left with a very monochromatic work of art.  


Mark the Date

One of the projects I did was a calendar.  I had a cheap white board one, but I could never get anything to erase from it.  So, I was out shopping and found this large, square, metal sheet in a frame that was meant to be a white board.  On clearance for cheap, I bought it even though it didn't match my style.  I found at one of my craft stores, a clear, plastic write on calendar.  Using paper I covered the metal and then glued the calendar on top. 


I also made some magnets to match from some extra paper and glass.  After finishing this, I went to find my whiteboard markers and realized how many I have.  So, I made a bag out of some left over fabric.  And here's the end product!


Thursday, November 10, 2011

Back to School

I first saw this in my cousin's apartment and then shortly after, a good friend of mine did one.  I love that even though they are the same concept, everyone's turn out differently. . . and who doesn't love playing with wax! :)

The end product.  All you do is glue the crayons to the top of the canvas, then I used a blow dryer to melt them and let them drip and splatter.  I really like the splatter at the bottom, so I didn't make it drip down too far.  A tip though for anyone wanting to do this project, lots of newspaper. . . you'd be surprised how far the crayon splatters can go.

Wednesday, November 9, 2011

I Love To See The Temple

I was at Michael's about a month ago and found these simple black frames in the clearance section for $1.50.  I thought I could come up with something to do with them so I grabbed 3 and when I went to check out, they rang up for a penny each! Score!


The tricky part for me was figuring out what to put in the frames and what to do with the very plain white matting.  As I was looking through my pictures, I found some that I really liked of the Salt Lake and Las Vegas temples I took back in April.  


An hour later and a quick trip to walmart and I had my pictures.  Of course my indecisive self took forever to decide what to do with the matting.  I wanted something that would add to the pictures and not take away from the focus.


Some acrylic paint and masking tape served the purpose very well.  Lucky for me, it ended up being an extremely inexpensive project.


Sunday, November 6, 2011

A Little Bit o' Bling!

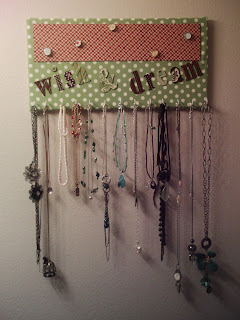
After years of tangled necklaces and mismatched earings, I finally decided I could make something to keep me from loosing my sanity. :)

It started with just necklaces.  I took a piece of canvas and covered it in a green polka dot fabric.  I also covered a small metal sheet with some fabric and glued it onto the canvas.  I thought I could use it to leave notes or thoughts on there.  I then screwed in hooks on the bottom of the canvas.  (Just a tip, use a drill to make the holes!  I spent way too long and got way too many blisters trying to screw them in by hand.)


I really liked it and realized that with the necklace issue fixed, I realized how hard it was to find my earings so I spent days trying to figure out how to organize them.  Finally, this morning, I realized that some chains would work perfectly, a way to hook in the earings easily and be able to quickly remove them.


That's it!  I added some words to make it even more fun.  Finally a cute solution to all my jewelry problems. 

The Witch's Hat

With Halloween coming up, I felt the need to create something from the up coming Holiday.  So here's my attempt at a Halloween decoration. . .

I found, at one of my favorite craft stores, a cardboard witches hat form.  I bought two sheets of scrapbook paper and ripped it into pieces and glued them on.  A fancy design strip, complete with skulls, was needed to make it look a little more Halloweenish. . . Then I finished it off with some ribbon!


A super fun and easy project!

Autumn Crafts

I've mostly posted edible creations so far, but I figure my crafts are pretty sweet creations too, so here you go!

A while ago I had Columbus day off and got into a crafty mood.  One of the few things that I actually completed that day was my Autumn wreathe.


I started with a metal wreathe frame, a leaf garland, some Autumn colored flowers, ribbon, and some wire.  I also use some hot glue to attach everything and tada!

Tuesday, August 2, 2011

Football Field Frenzy


Recently, a friend of mine got married.  She asked me to be a bridesmaid and then a couple months later told me about her plans for a grooms cake.  Her fiance/husband loves BYU sports, especially football.  She was having the woman who was doing the wedding cake make a BYU football helmet and football.  She thought that it would be really cool to have a football field to put them on and asked another bridesmaid and I to do it.  So, here it is.


We ended up using rice crispy treats to make the cake.  It's 12 inches by 18 inches, so it took alot of rice crispy treats.  Since he does love BYU, I dyed the rice crispy treats blue.  Then I covered them with buttercream to make it smooth. 


It is covered in green fondant that I made.  I found some tiny cookie cutters to make all of the numbers and letters.  The yard lines are piped on.  The words Brigham Young and Cougars, I made by making some blue fondant and white fondant, cutting out the letters, and then stacking them on top of one another.


The center Y was made from a fondant oval, colored with edible marker and then a Y cut out and place on top.  Finally, I edged the cake with green buttercream frosting piped on with a grass tip.  The cake turned out great as did the wedding.  Congratulations to Courtney and Mike!

Tuesday, July 26, 2011

Tasty Sunday Treats


A couple weeks ago, I got bored after church and started baking.  The first thing I made was butter bread.  I got the recipe from a good friend back home and it is delicious!


As implied by its name, butter bread has lots of butter!  Each segment is dipped in butter before it's baked.  I love eating it with strawberry jam. . . :)


I then continued my baking spree by making some cake.  This is a chocolate fudge cake with a dulce de leche filling and then frosted with home made chocolate buttercream frosting.  It was very tasty!

I was in a hurry to get to a gathering of friends, so I didn't spend a ton of time trying to make it look great, but I think the taste made up for it. : )


The Actual Wedding Cake

Finally, after months of waiting, here are the pictures of the completed wedding cake. I made all the parts and then had to send it with the bride's sister. I never actually saw it completely finished. There were a second set of pillars for between the top pillars, they were only three inch ones, but I don't know if they ever ended up using them. They were getting ready to cut into it, so the ribbon on the middle layer was already taken off.
The cake was three layers, with a fountain in between. It was a pretty simple design she wanted, square with ribbon. The cake is carrot cake and a cream cheese icing all covered with white fondant that I made.

Wednesday, May 11, 2011

Practice. . .

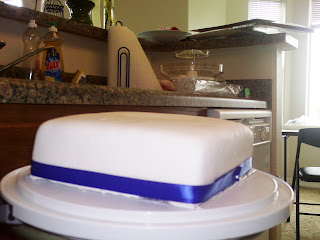
A couple months ago I offered to make a wedding cake for a friend. Well the wedding is next week so I thought I should probably make a practice cake so she knows that I'm not completely incompetant. :)

It's a pretty basic cake. This is mainly so she can try it and make sure that I understand what she wants. It's going to be three tiers with a fountain between the bottom and top two tiers. Since her colors are blue and green, we'll alternate ribbons on the tiers.


The bottom tier will be sixteen inches, then there will be the fountain with the clear pillars I found. The top tiers will be twelve inches and eight inches. If you look closely at the background, you can see the fountain in the background.


We're doing carrot cake with cream cheese icing. Then nice, smooth fondant to cover and make it look good. Pictures of the finished product will be coming in the next couple weeks!